Tag Archives: Engine

Progress Update

As the final week of prep seems to be flying by we do seem to be making some progress. All the external cleaning with the pressure washer and hand washing is now done and the bodywork has been polished.

After dithering over making a decision on the power steering box leak I finally decided that I would replace it with a reconditioned  one. The final deciding factor was when I realised that the current box is missing a dust seal on the output shaft. The reconditioned one is now fitted and seems to be leak free, let’s hope it stays that way !

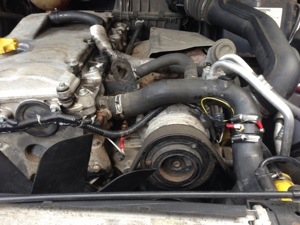
Today was spent cleaning out the front passenger area of the vehicle, doing more under bonnet cleaning and a couple of maintenance jobs including replacing the serpentine belt with a new one. We’ll have spares with us but no point in starting off with one that’s already well worn !

By the time we ran out of light the front interior was all cleaned and put back together again and I’m banned from getting in the front now unless I’m wearing a forensic suit. The engine compartment is all back together again so tomorrow we’ll finish cleaning the rear cargo area and I’ll probably spend the day underneath it with a torch, some cleaning rags and a bag full of zip ties 🙂


Yet more wiring !

Isolation Switches

Isolation Switches

It seems at times that the amount of wiring in the 90 just keeps going up and up and up ! This last weekend I’ve had the dash apart again, hopefully for the last time before it ships…

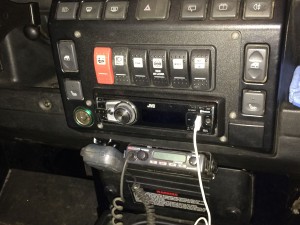
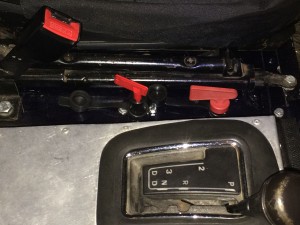
I wanted to add a couple of isolation switches both for safety and also to ensure that the batteries will make it to the other side without being discharged. I wanted to add an isolator for each battery so they could be isolated individually. If nothing else this means I can leave the auxiliary battery disconnected so if the main battery gets left on during shipping we can jump start it from the auxiliary battery. Positioning the switches so they are accessible from both seats and at the same time reduce the risk of them being accidentally switched off took some thinking about and in the end we settles for a position next to the passenger seat. The main battery switch is an FIA type which has the extra contacts that I’ve wired in so that the switch will also kill the engine if turned off with the engine running.

iPad mount and map light

iPad mount and map light

I have rewired the switches for the spotlights and the rear work lights – the rear work lights were connected to a Carling switch on the dash and the spotlights to the Land Rover spotlight switch. This was OK but didn’t give too many options for the spotlights and, as they are LEDs and can be left on for long periods without draining the battery, I wanted a switch that would allow them to be turned off, on only with main beam and on independently. To achieve this I changed them around using a Carling switch for the spots and the Land Rover dash switch for the rear working lights.

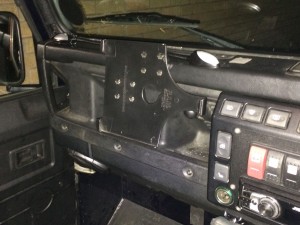
With the Dash apart I changed the iPad RAM mount from the seat mounting type to a universal mount on the dash. The seat mount is OK but tends to wobble around all over the place when you’re crossing rough ground, so much so you have to lock the rotation on the iPad. The dash mount takes up less room and will stop the annoying wobbling !

IMG_0421

Australian CB Radio

I also added an LED interior light for the passenger area that works in addition to the factory interior lights and fitted the mount for the UHF radio (Australian CB radio), connected up the power lead for the radio and the aerial lead. I also got around to fitting the map light to the top of the dash. All in all a busy few days and lots of jobs “ticked off” the list in the process 🙂


Intercooler Upgrade

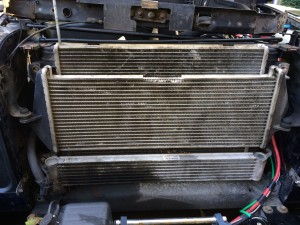
Original TD5 Intercooler

Original TD5 Intercooler

After much procrastination we finally decided to get an intercooler upgrade a month or so ago. Due to the auto box oil cooler we had to get a custom one made rather than an off the shelf item which has led to time delays but it finally arrived this week. So my first job on Saturday morning was to get on and fit it…

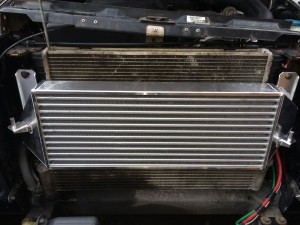
The new intercooler from Ali Sport wasn’t a completely straight forward fit (when is it ever !) and I ended up having to grind away part of the near side bracket that holds the intercooler and modify the slam panel and anti-burst catch.

The mounting bracket was just touching part of the side tank and, although it would kind of fit, over time the two parts would have rubbed together and probably made a hole in the side tank.  To make sure I got the angle grinder out and reshaped the bracket to give more clearance.

Uprated Ali Sport intercooler

Uprated Ali Sport intercooler

With that done I then put everything back together and found that when I closed the bonnet the anti-burst catch was hitting the top of the intercooler, preventing it from closing. By bending the guide in the slam panel and some adjustment of the pin plate and the catch itself I eventually managed to get the bonnet to shut with the catch missing the intercooler.

A road test showed a noticeable difference in torque with the 90 pulling up the hills without the need to kick down or losing speed. So far we’ve both been impressed by the difference it’s made to the way it drives, probably should have done it ages ago !

Engine monitoring system

20130620-104113.jpg

I started to fit the sensors for the EMS today. The engine monitoring system I’ve chosen is a South African design and it should give us an early warning of any problems developing with the engine.
The EMS will monitor and display:

  • Coolant temperature
  • Coolant Level
  • Exhaust Gas Temperature
  • Oil Pressure
  • Battery voltage
  • Transfer box temperature

20130620-105003.jpgThe gauge itself replaces the standard temperature gauge and allows alarm levels to be set for any of the items it is monitoring with both a visual and audible alarm.
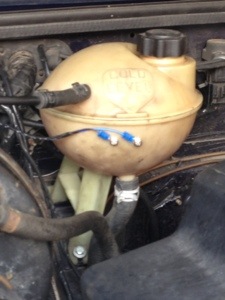
As I had to drain the coolant to fit the coolant temp sender I also replaced the thermostat – one of those jobs that’s been on the “to do” list for a while now.
The oil pressure sender was the only one that caused me some grief. Partly this was because the kit seemed to have the wrong adaptor with it. I had a suitable adaptor in the garage so I managed to get around that particular problem. The bracket that the sender comes with though is a bit small for it’s intended use and that, combined with limited space between the cylinder head and the air filter box made the job a real PITA.
Anyway, the sensors are in and the wiring made up to the bulkhead so just the gauge to fit and the wires to join up and it’s just about done.

Clearing the under seat box

Plan A - ECU and fuse box position behind driver's seat.

Plan A – ECU and fuse box position behind driver’s seat. A nice idea but no way the looms will reach.

Having quite a few days holiday left to book before April and intending to head up to the Muddy Truckers Trophy at the end of the month, I’ve booked quite a few days off this month with the intention of spending a lot of them working on the 90.

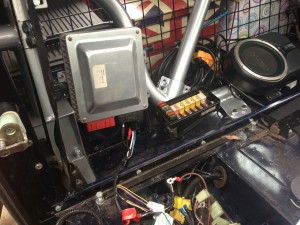
The first job on the list was to clear the underseat box where the engineECU, gearbox ECU and fuse box are located. There are a LOT of wires under there with the 2 big vehicle wiring looms and the gearbox loom.

The initial plan was to try and move everything behind the driver’s seat, if necessary extending the looms although, if possible, I wanted to avoid that. After disconnecting all the wiring and tracing it’s route it became increasingly clear that moving everything behind the driver’s seat would be a much bigger job than moving everything behind the passengers seat. The trouble was that I’d also mounted the aux fuse box and ARB compressor behind the passenger’s seat.

So, the plan got a lot more complicated as I ended up having to move the aux fuse box and ARB compressor to the driver’s side to make room for the engine ECU etc… The good news was that the route of the main and engine looms meant that both looms would be long enough to reach without modification/extending although a few wires would have to be extended such as the diff lock and high low switch wires but that’s no problem.
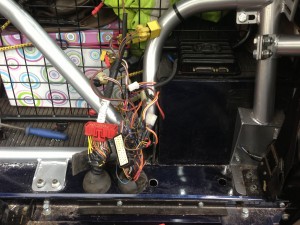
Plan B - Main two looms relocated behind passenger seat

Plan B – Main two looms relocated behind passenger seat – gearbox ECU on top of wheel arch.

Having checked the lengths of the looms and made sure I got them the correct way round, the first step was to drill the holes for the two looms to come through the floor having removed the aux fuse box and the ARB compressor. On mine this was limited by the length of the bulkhead loom so that was the important one to get right. Once that was in the engine loom hole went in alongside it.

I took the opportunity to tidy up the gearbox ECU wiring too, shortening the loom to length. When it had been mounted under the seat it didn’t really matter too much how much wire was floating about so I just used the whole loom as supplied with the ECU.
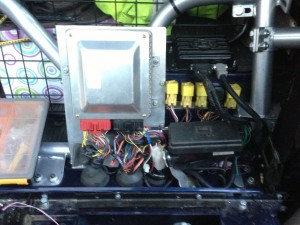
ECUs, relays and fuse box relocated.

ECUs, relays and fuse box relocated.

I made up a mounting bracket for the fuse box and cut up an old bulkhead fuse box plate to make a mounting plate for all the relays to mount onto on the front of the wheel arch. The final task was to make a mounting plate for the engine ECU to mount to. The intention is to make a cover that goes over the whole setup but that will probably have to wait for a while as it’s not a priority.

The good news is that, after this major surgery, the engine and gearbox and all connected circuits are working fine again so I can move onto the next job. Just need to get the aux fuse box, ARB compressor and subwoofer back in now and put the interior back together again !

That’s it, summer is over

snorkel2Took the roof tent off today, it’ll live in the dining room until it’s next needed. We’d been discussing how we were going to get it down off the roof safely for a while and in the end we went for a combination of winch and straps to make a “ramp” for it to slide down. It worked really well and the tent was soon safely delivered to the ground without too much effort.

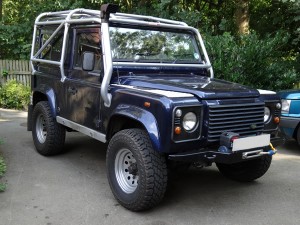
The plastic air intake cover on the off side wing went MIA somewhere on it’s daily commute into York and back. As good a reason as any to fit the P&P snorkel that we’ve had sat in the dining room since the cage was fitted. Pleased with the look of it and should be a big enough diameter for the performance to be unaffected. The snorkel came with a vortex style ARB top that we’ll save for Australia, The Safari snorkel top is a straight fit, arguments about ram air effect versus collecting water/grit ignored in favour of looks, it’s facing forward at the moment !

Found the missing power

Since fitting the TD5 the performance has been a bit flat at higher revs. While this has been good for fuel consumption figures it’s been a bit annoying. I rigged up a makeshift fuel pressure gauge today using an oil pressure gauge and sender.

Turns out we were only getting 20 psi at the rail, the TD5 is supposed to run at more like 65/70 psi at the rail. I replaced the pickup in the tank with a 300TDi version and it’s transformed the vehicle. A good constant 70 psi at the rail and it shows in the performance. Were it not for the diesel rattle you’d almost think the V8 was back.

Still need to sort the exhaust out though as it’s still running with the “temporary” one I hooked up using bits of the V8 system.

It lives :)

Patrick sorted the problem with the gearbox pipe, it turns out that the push on connector wasn’t quite locating. Some of the steel pipe section needed bending slightly to give the flexible pipe a bit more slack so it would push on properly.

So it’s all up and running now and just needs a bit of bedding in and tweaking. The engine seems a bit low on power at the moment so I’ll need to figure out what’s going on there. It’s fine at low revs but seems to hit a brick wall at higher revs.

It moves… while it did !

Finally got the 90 back on the road after it’s engine and gearbox transplant. We took it for a trip over to see Patrick at Maddison 4×4 so he could help me set up the Compushift to improve the shifting pattern for the electronic auto gearbox.

As it turned out this particular “shakedown” revealed a problem with the gearbox oil cooler pipe on the driver’s side. When we pulled into the petrol station for our first diesel fill up, a passer by pointed out an oil leak at the front. As it turned out the gearbox oil cooler pipe had popped off, probably as we pulled onto the forecourt. Didn’t lose too much oil and managed to get the pipe pushed back on again and continued our journey.

Unfortunately that wasn’t the end of that particular problem and while Patrick was doing his stuff and showing me how to set up the shift points we lost all drive. The pipe had come off again and, this time, deposited the contents of the gearbox all over the road. We weren’t far from Maddison 4×4 so a quick phone call brought copious amounts of “cat litter” to mop up the spill and we towed it back.

By this time it was dark and getting late so we borrowed a courtesy car for the night and left the 90 with Patrick to see if he could get to the bottom of the problem with the push on connector.

The plan starts here !

This really starts the ball rolling as far as preparing for the trip is concerned. Our chosen vehicle has a 3.9 litre V8 petrol engine that also runs on LPG. The downside of this for a trip like we have planned is that it’s too thirsty to give us the range we need/want without using all the limited interior space for fuel.

Converting the vehicle to diesel makes the fuel situation and range problem a lot simpler so, with some trepidation our beloved V8 90 is going to have an engine and gearbox transplant. A couple of years ago I rebuilt the vehicle and in the process used the main wiring looms from a TD5 Defender. At the time it meant a lot of work integrating the V8 electrics with the TD5 loom but fortunately I did it in such a way that the main harness was untouched. I also changed the fuel tank to a rear mounted TD5 style so there is room for the ECU box under the driver’s seat !

So, we bid farewell to the glorious burble of the V8 and replace it with a tractor engine.. albeit quite an advanced one by Land Rover standards !

We’ve stuck with the auto, a reconditioned/upgraded unit from Ashcrofts, and tracked down a low mileage “15P” prefix engine back in October. I’ve simplified the fuel system, in comparison to the normal TD5 setup, with an external pump and some bits from a 300TDi.

Mike is going to give me a hand when I’m lifting the engines in/out and Patrick will come over with his box of tricks and set up the ECU once the TD5 is in and ready to fire up. I’ve already taken the rocker cover off and got the injector codes off it. The ECUs (I got a spare one) are both configured for a Discovery at the moment so he’ll also reconfigure them for the Defender. Just in case the weather turns nasty I’ve put my plastic “garage” up on the drive to keep the worst of it off.