Tag Archives: Fuel System

New Propshafts

Fuel and Battery Gauge on DashBoth the front and rear propshafts have been on the “hit list” for a while due to the amount of play in the splines. On my competition motor I fitted a Bailey Morris heavy duty prop shaft after snapping a rear one and decided it was worth the extra money for the quality of the splines and the larger UJs so decided to go the same way with the 90. 2 propshafts along with 2 spare UJs for the spares kit arrived last week.

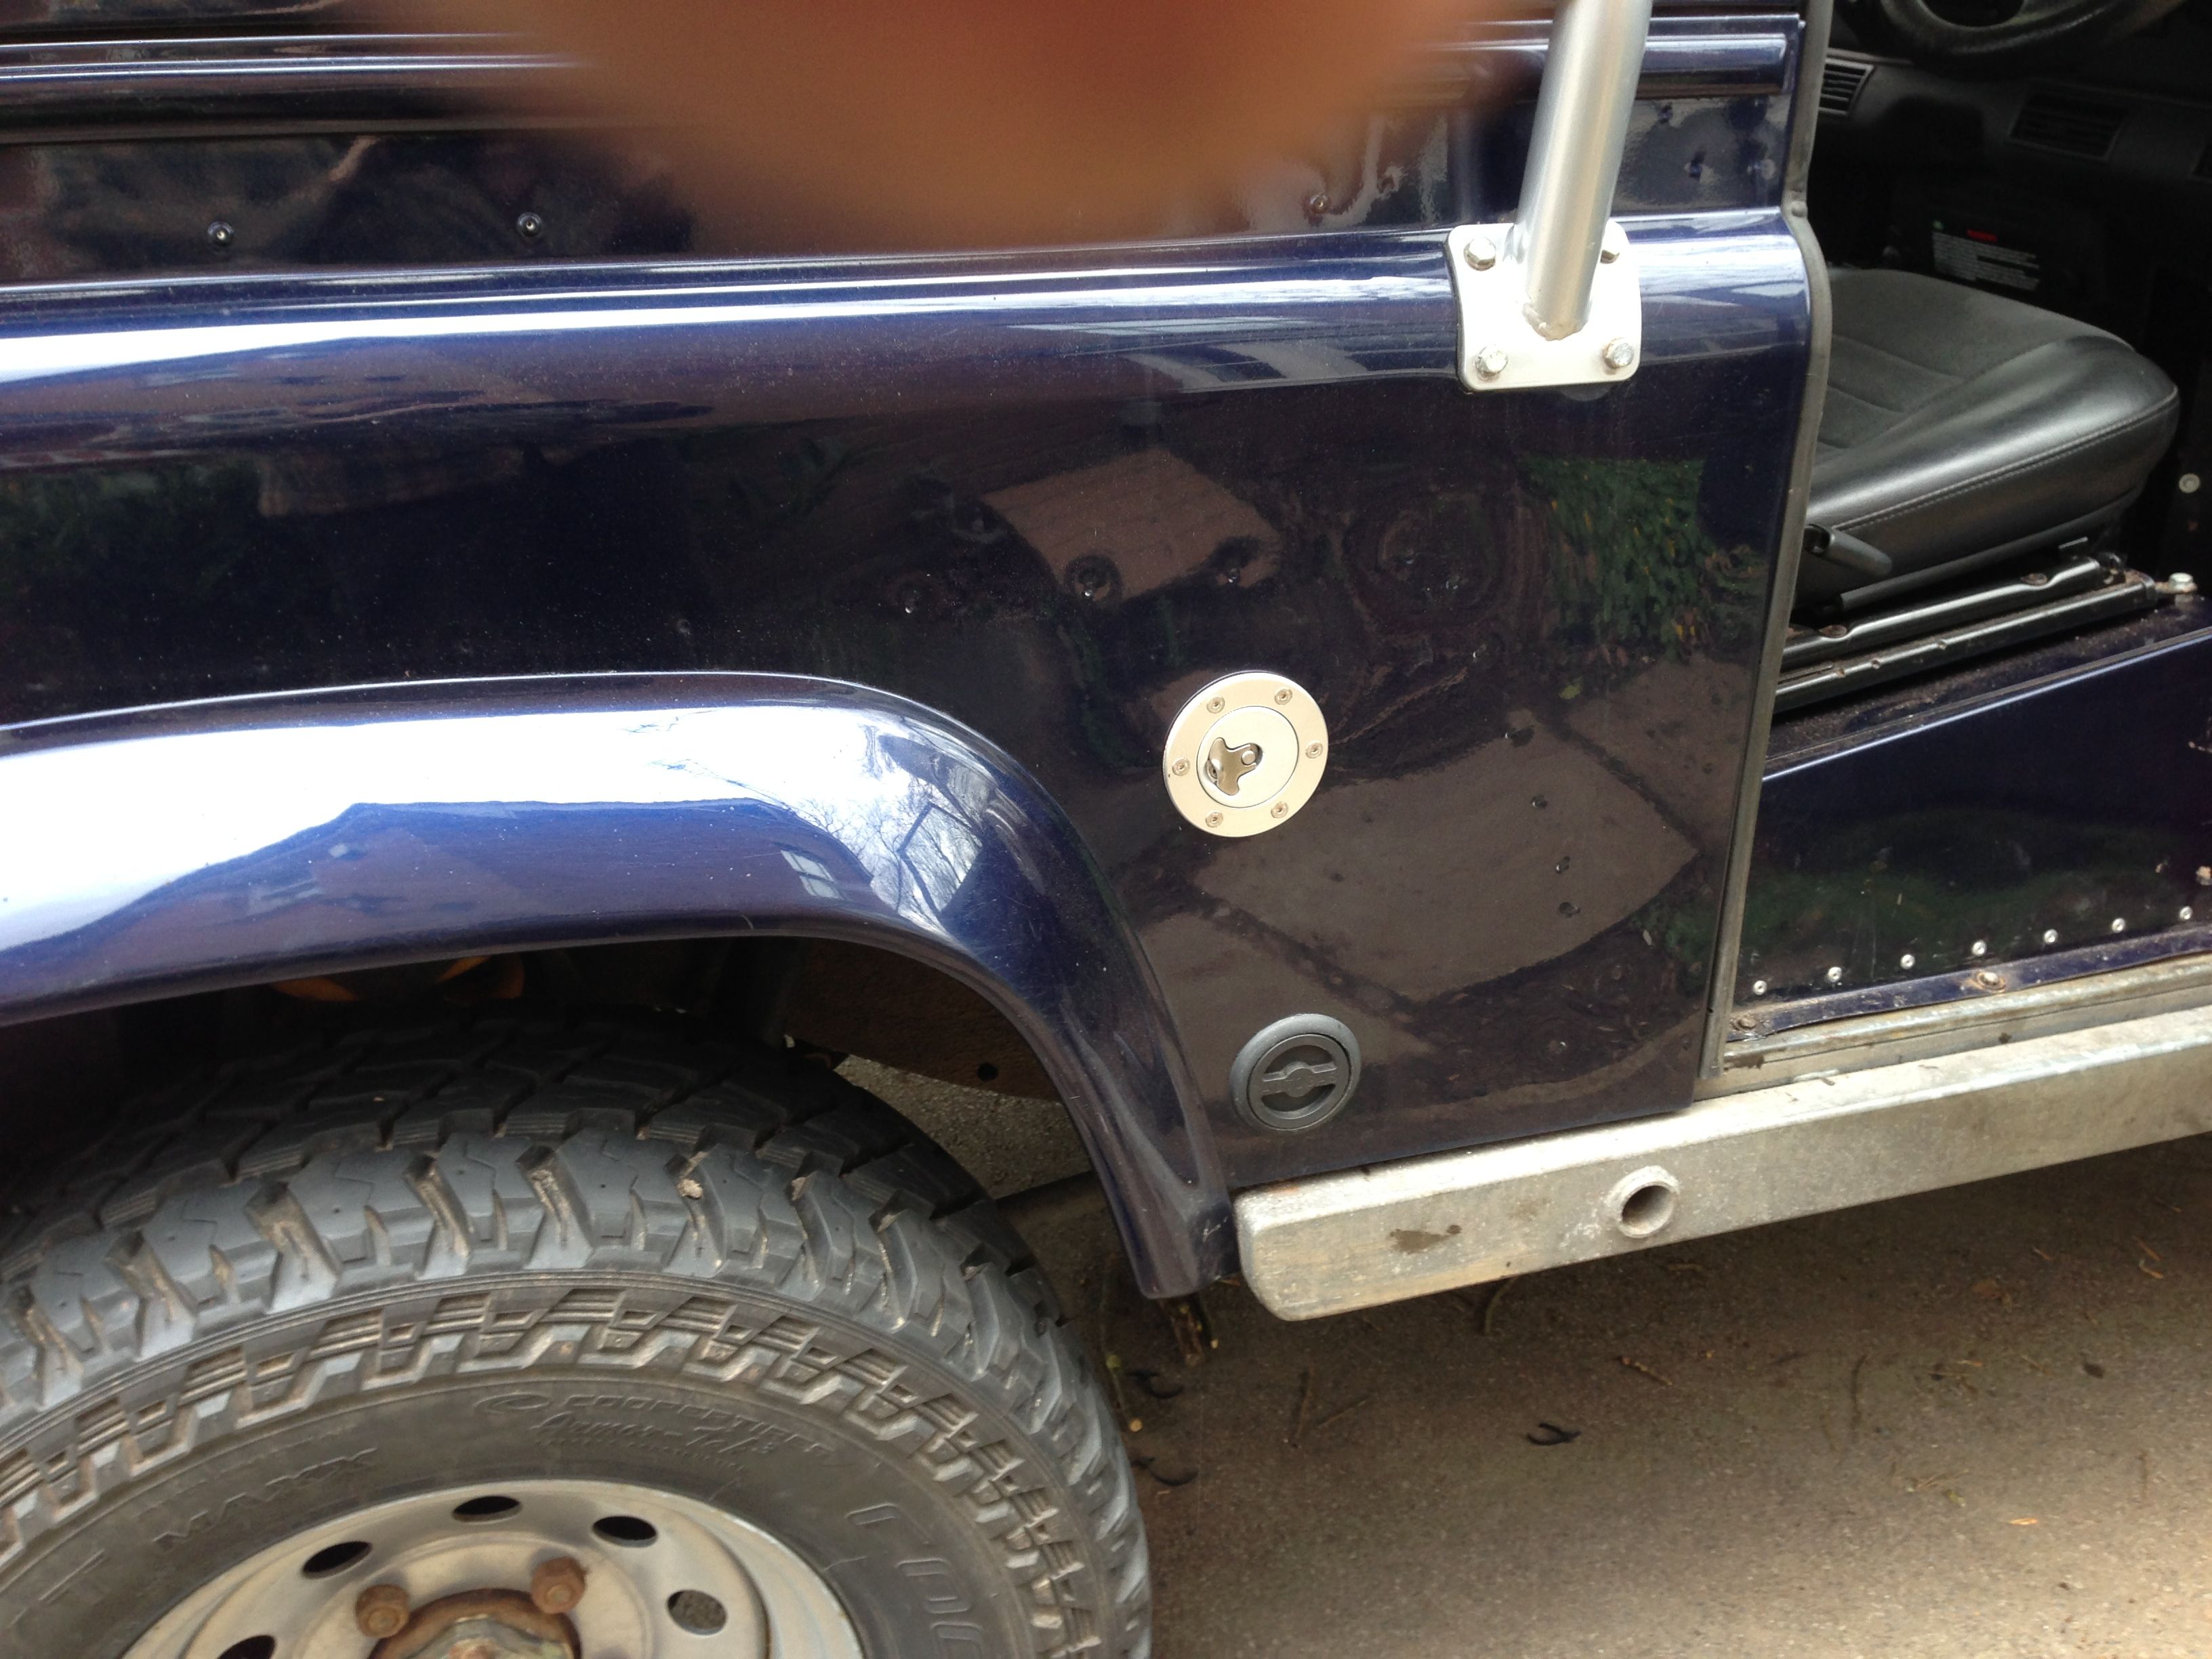
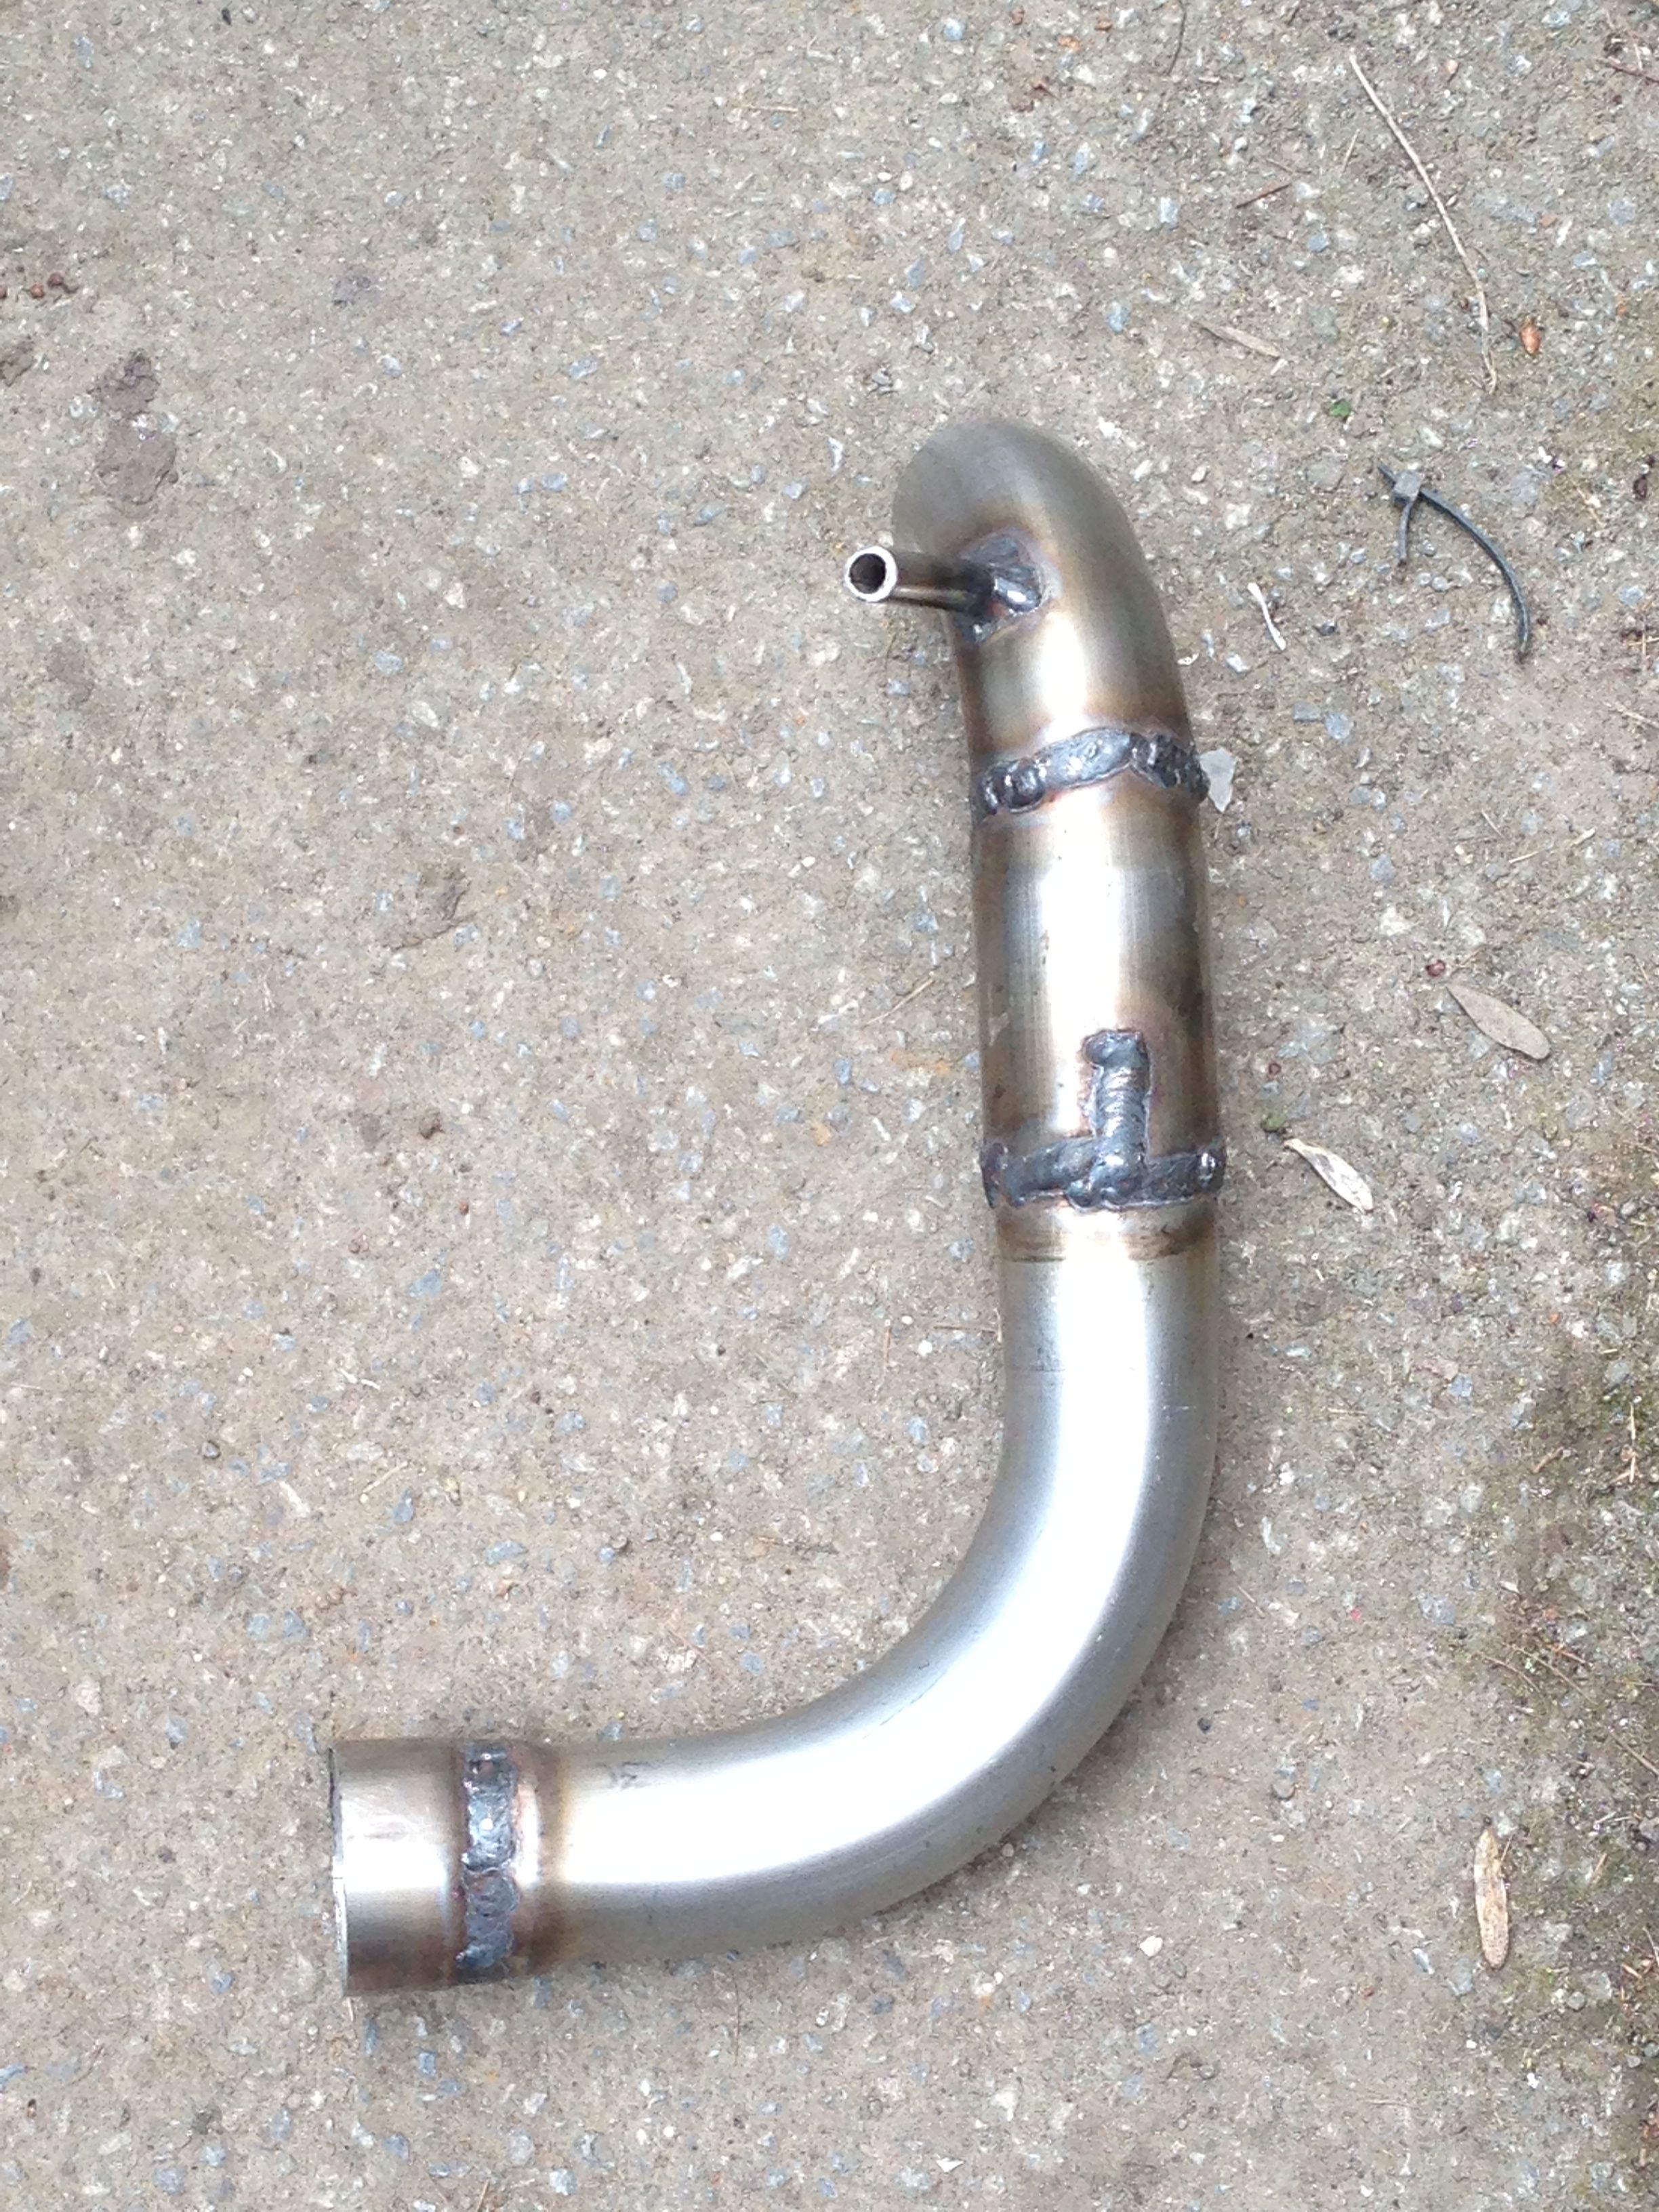
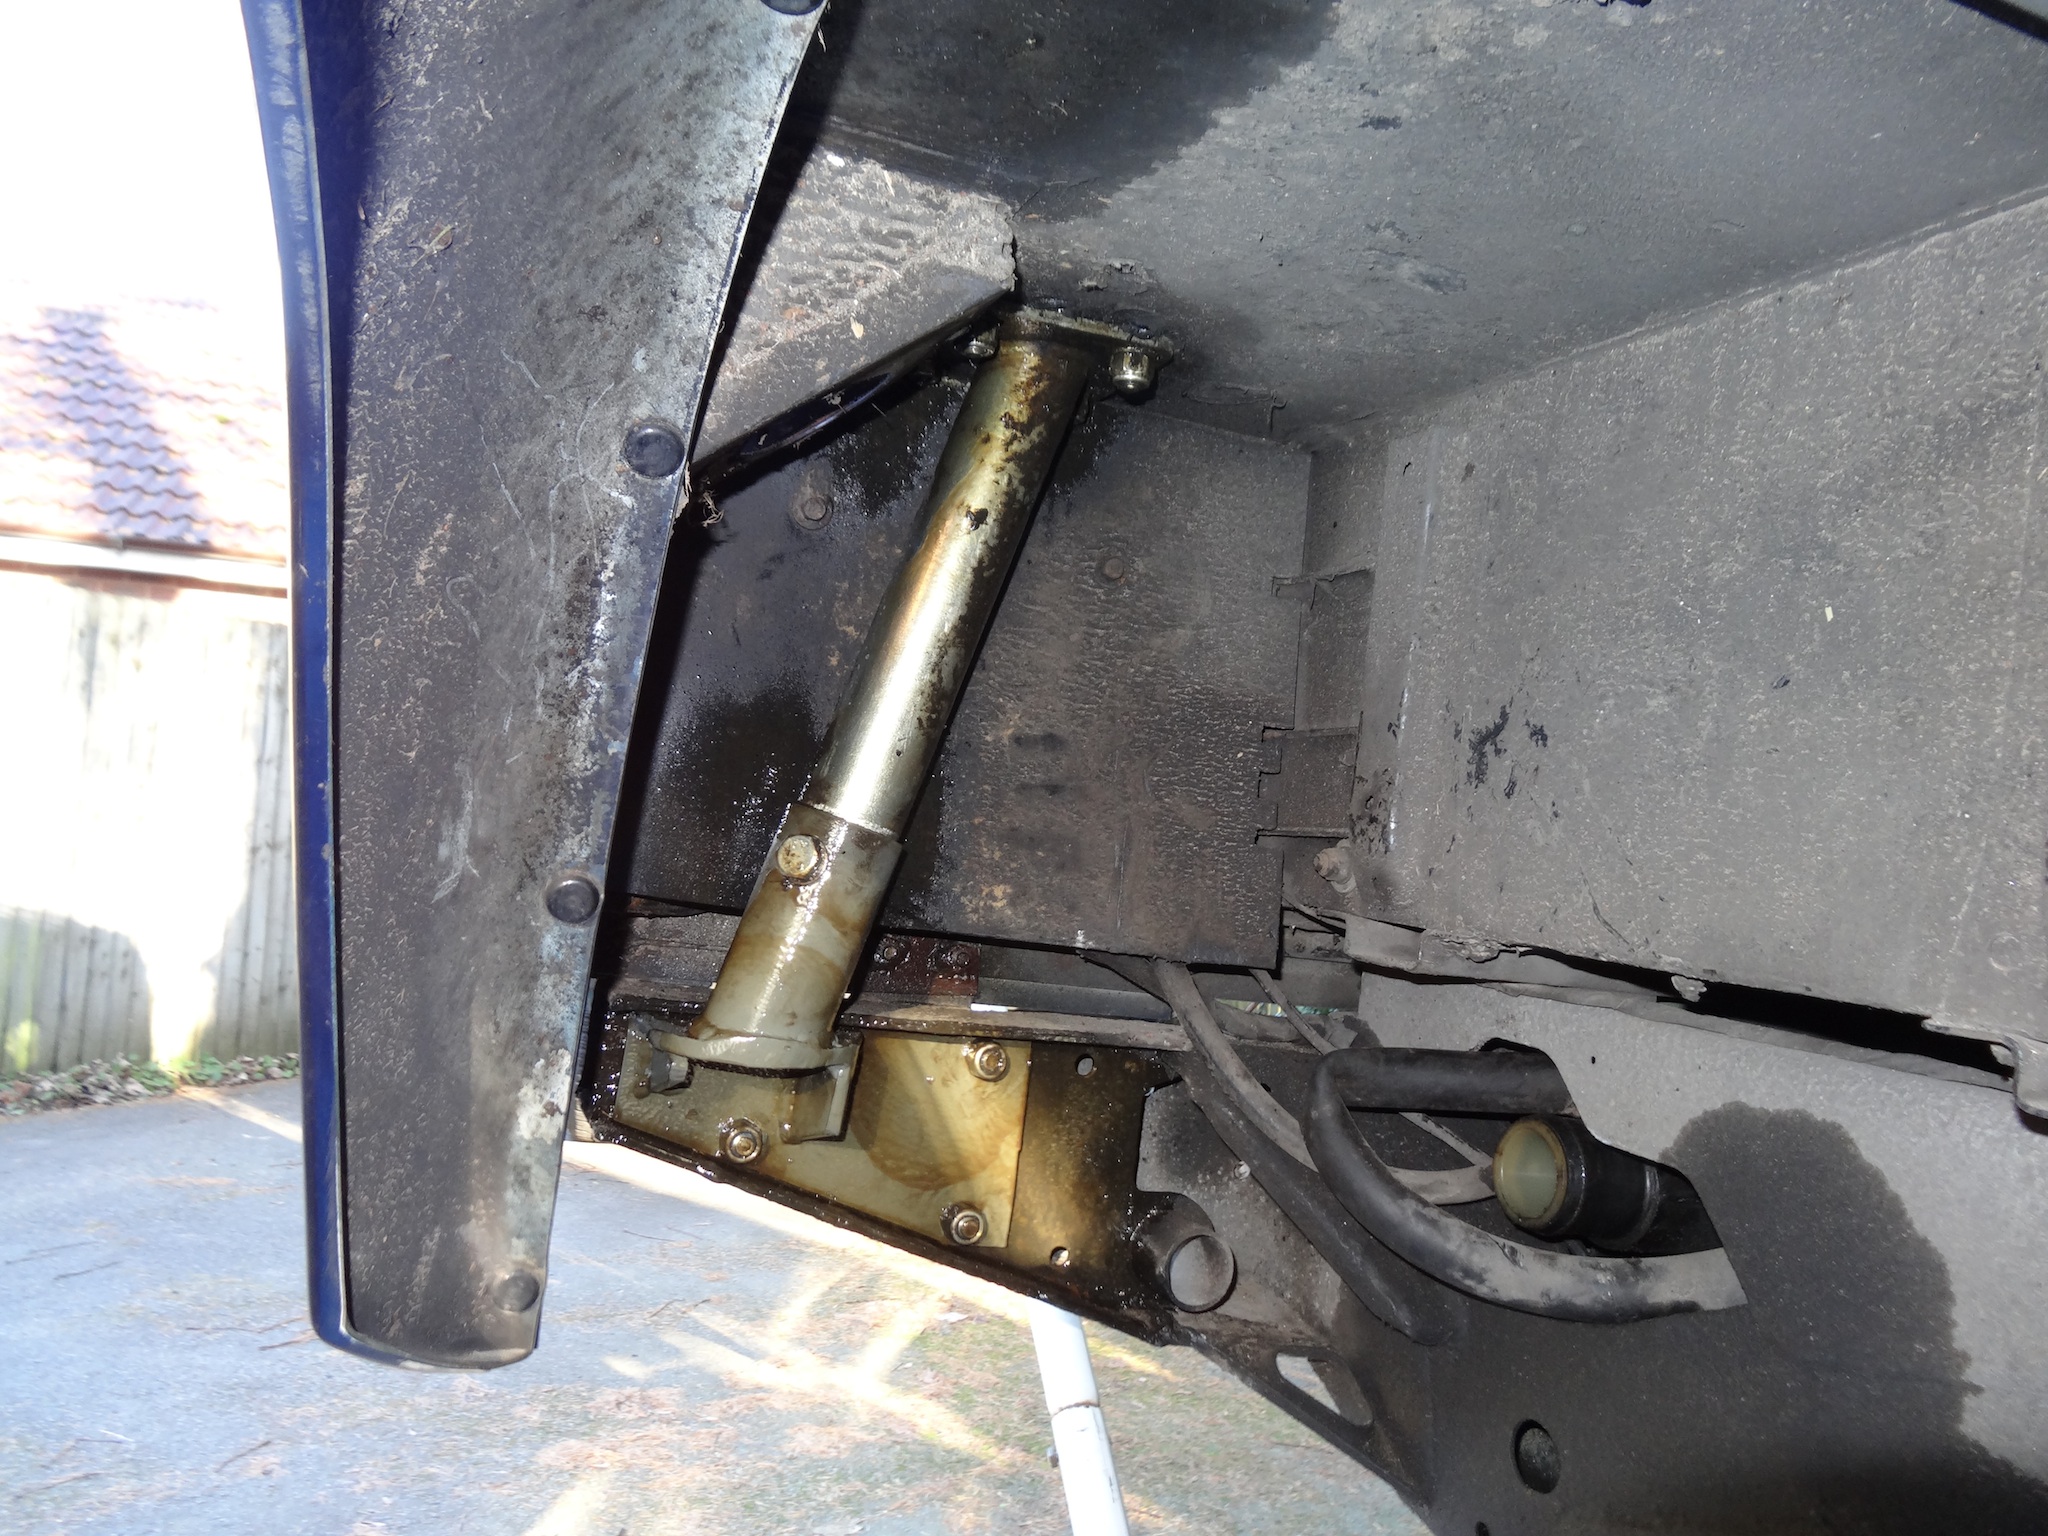
So, I ticked off a few jobs in the end this weekend – I added a foam rubber strip between the tyre rack and the roll cage at the front as it was whistling quite loudly above 40mph, all quiet now. I also fitted both new propshafts, fitted a new steering damper with relocation bracket to the steering drag link – removing the one from the track rod. In an effort to fix the annoying slight oil leak from somewhere around the transfer box I took the bottom plate off it and resealed it while changing the oil. I had a play with a number of ideas to try and mount the ground anchor somewhere and decided in the end it really is too cumbersome to fit in a 90 !

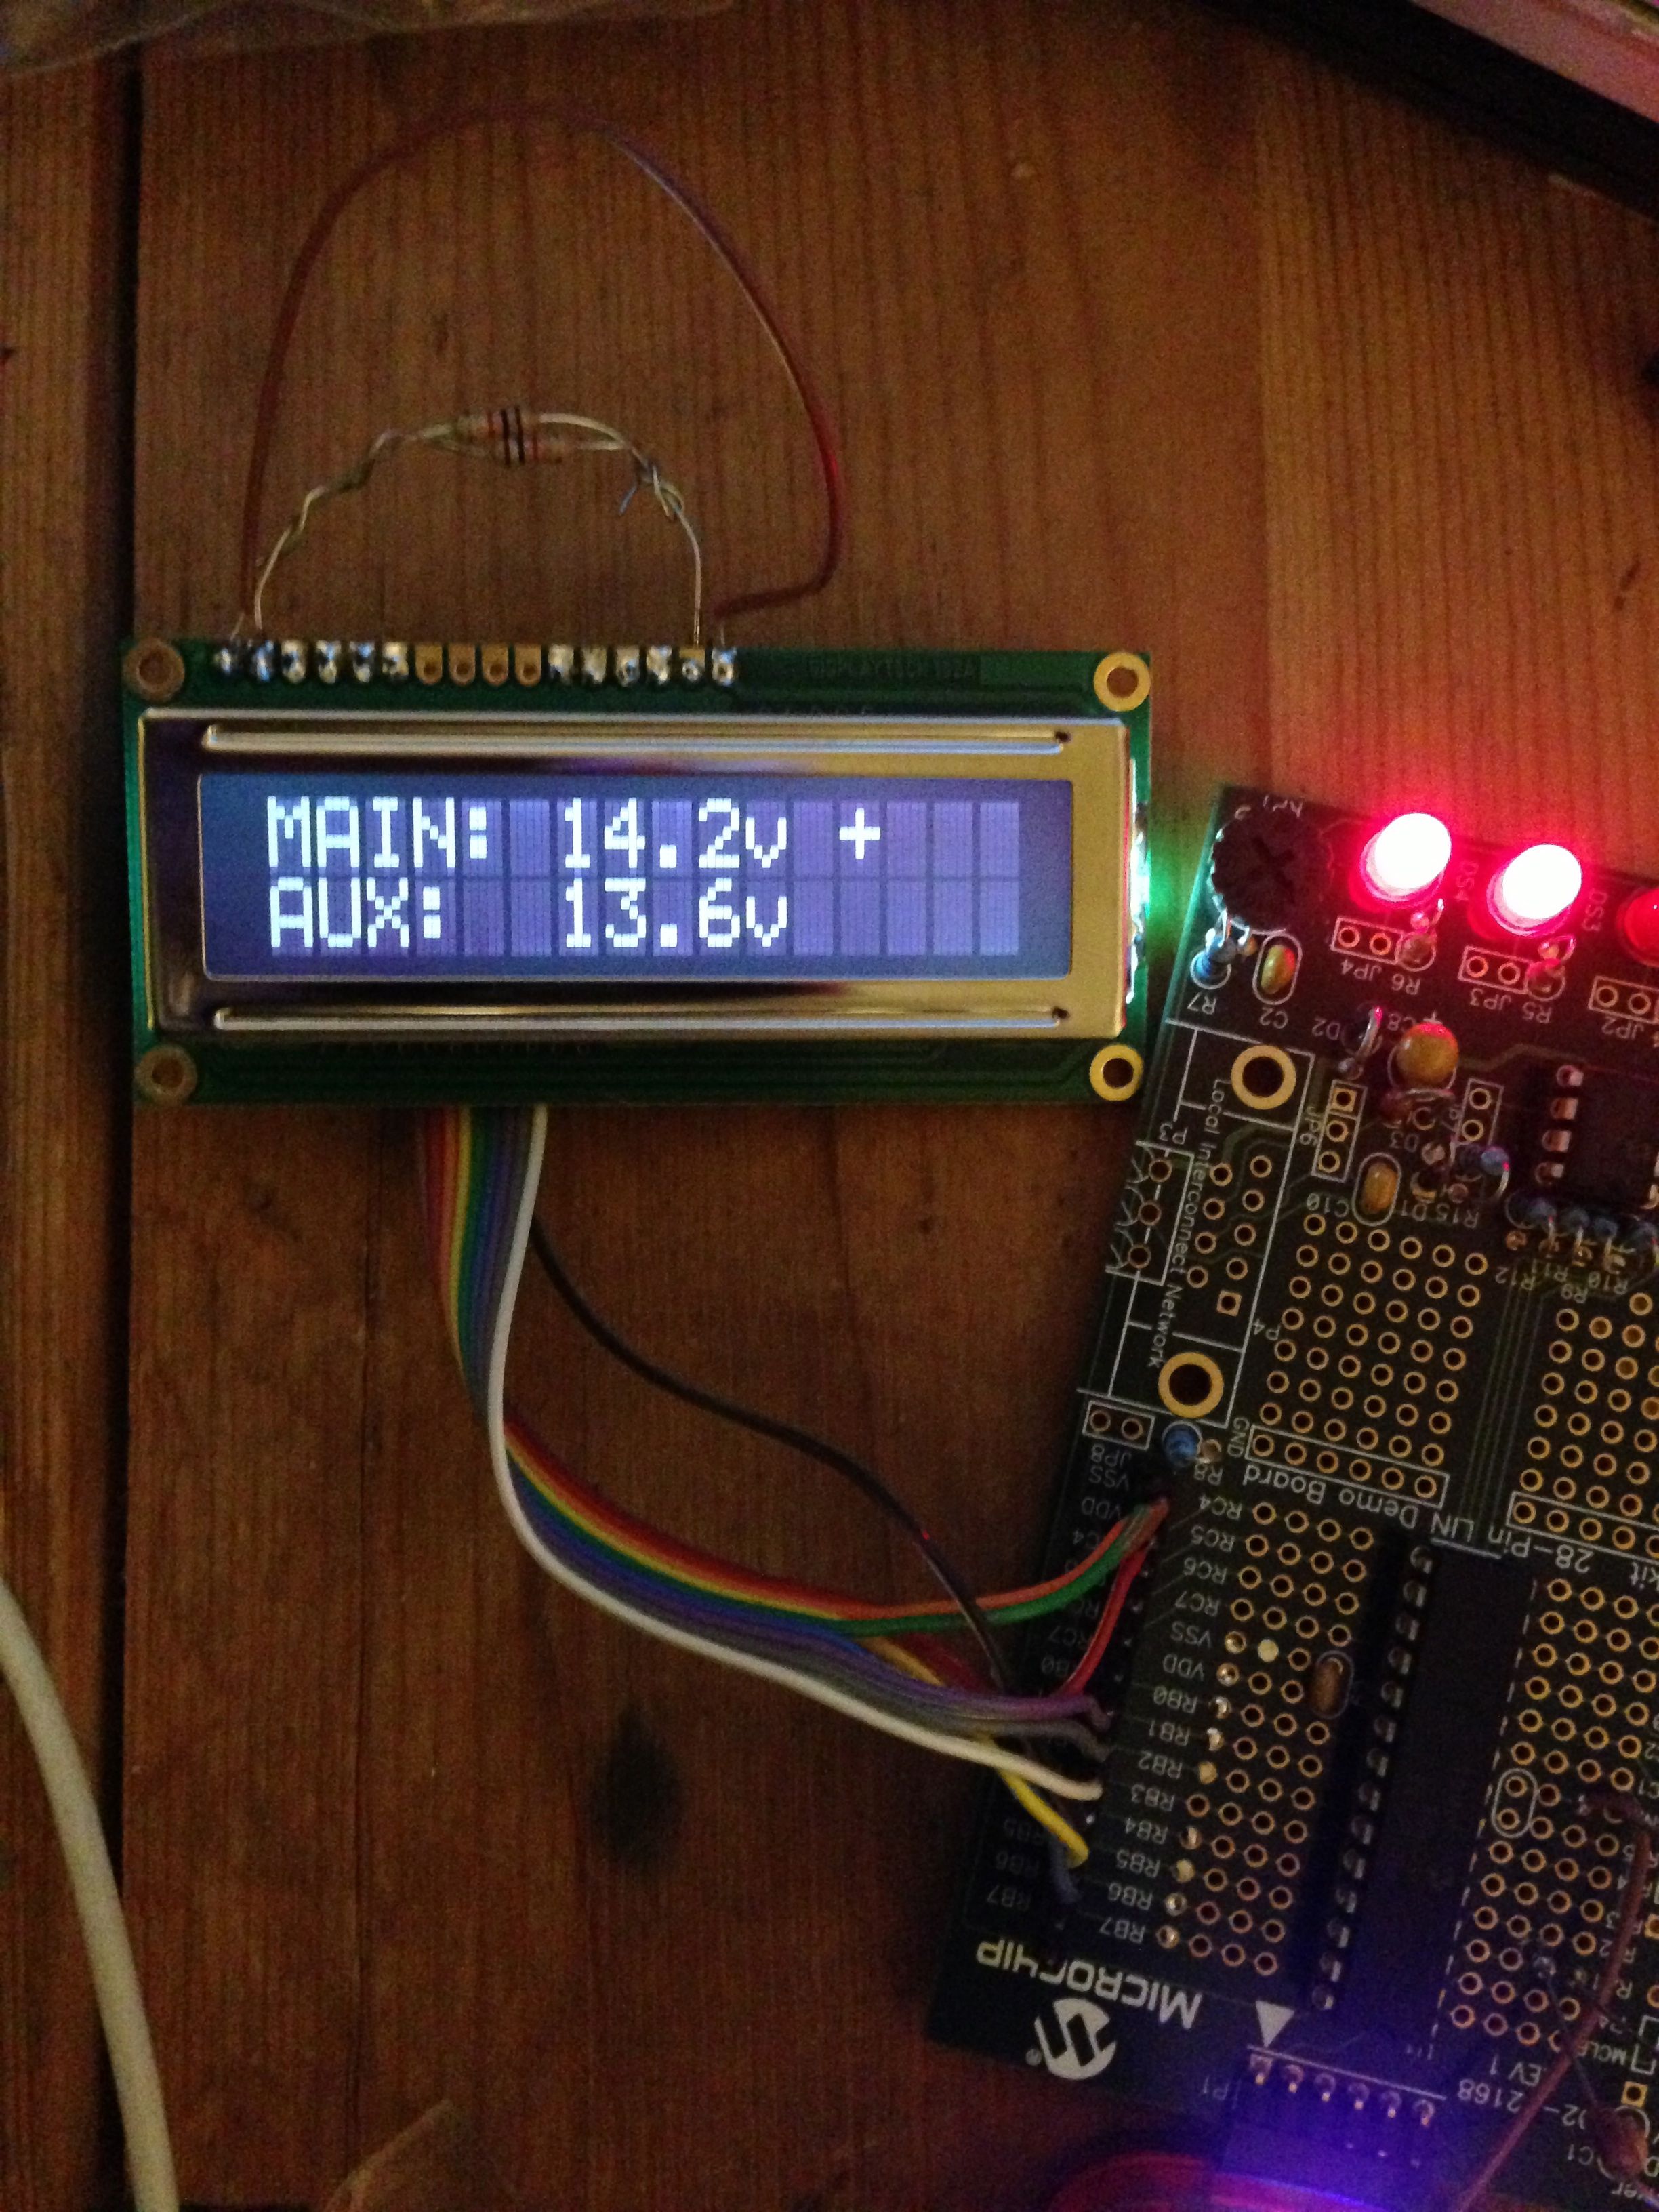
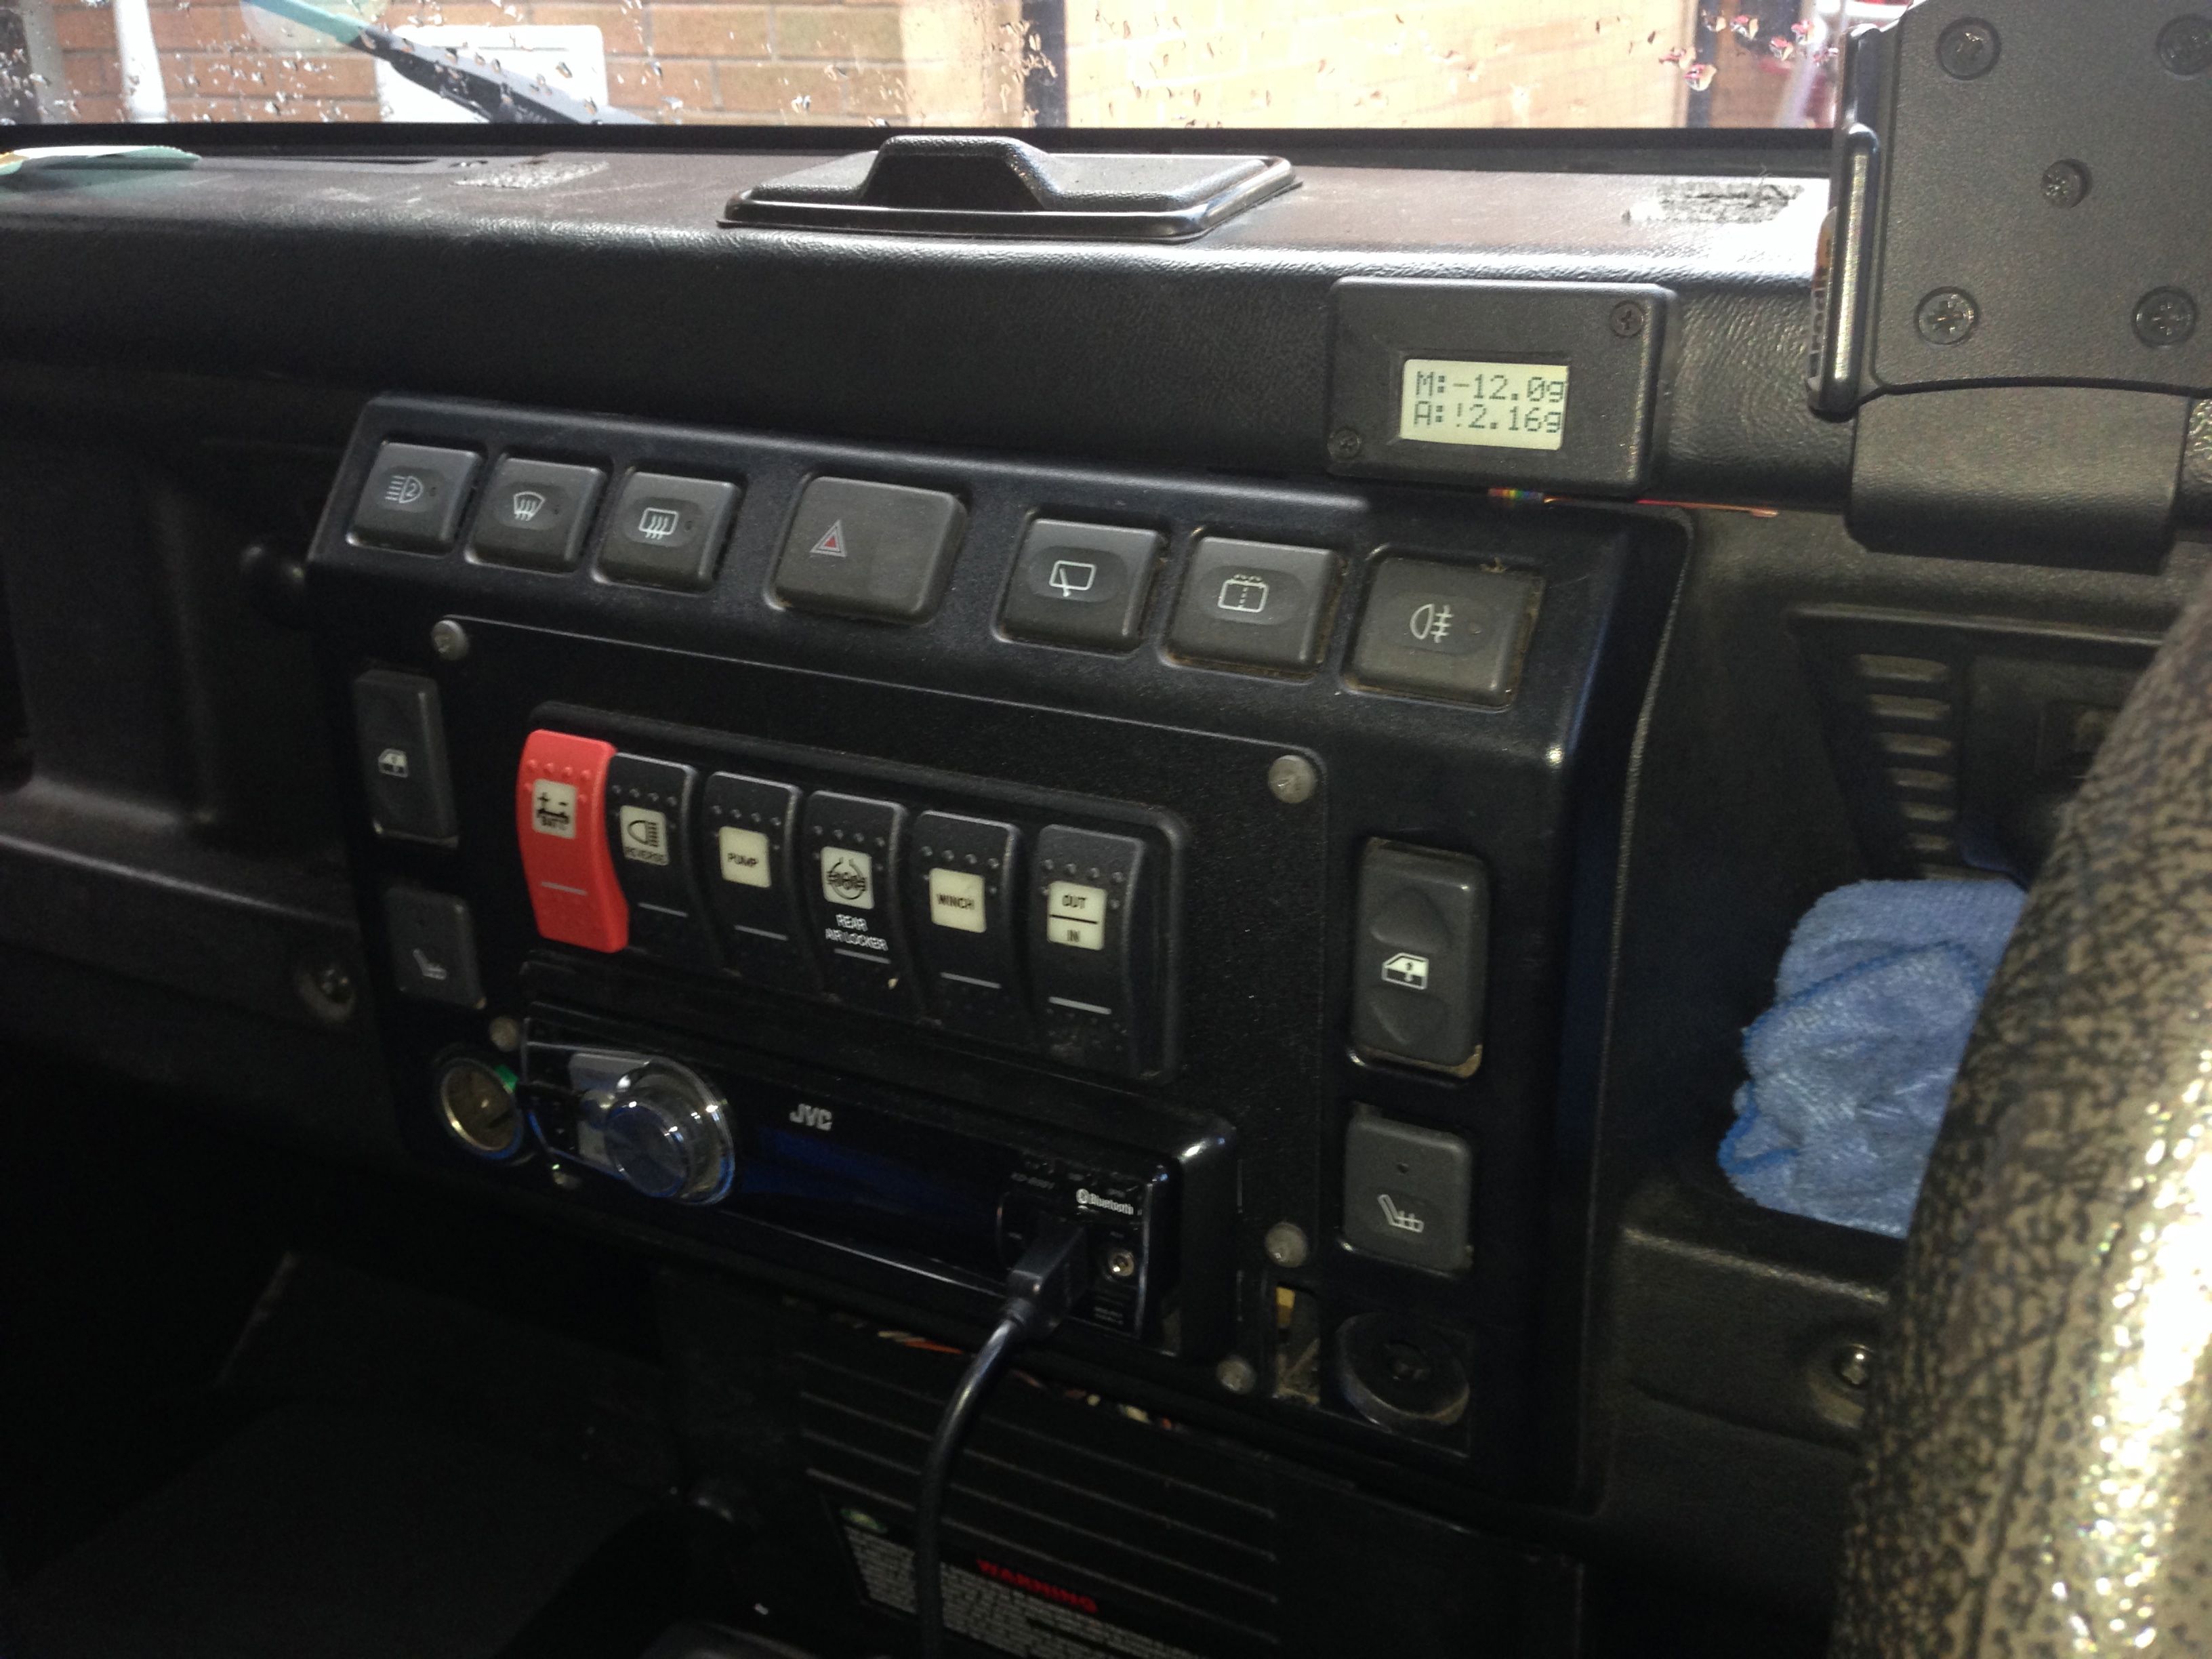
Sunday was spent doing a final fit and gauge calibration for the infamous battery and fuel monitor, in the afternoon we took it for a long run out to make sure the props and steering felt good and that the fuel gauge and fuel consumption was something like. All seemed good, the new propshafts have fixed the vibration we were getting on overrun, the steering wobble is completely gone and the spare tyre rack was quiet at all speeds πŸ™‚

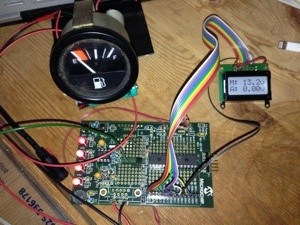
Just to prove that the battery/fuel gauge thing is actually fitted and working at last I even took a picture of it ! It sits quite neatly above the normal centre dash switches…

Fuel and battery monitor goes beta

20130621-131829.jpgThe fuel and battery monitoring system is now ready for the next stage, transferring the design from a prototyping board to a custom board design. The new 2×8 character display seems to be clear enough and is small enough to mount in the dashboard somewhere. I’ll add/maintain support for in situ programming of the PIC chip so I can tweak the calibration and display functions as required.
Hopefully I’ll get the PCB Design finished and the board etched this evening.
The module itself has suffered from a bit of bloat ware during the design process but hopefully it’s now got all the hardware features it needs to support and anything beyond that can be tweaked in the software. Once it’s all finalised I’ll create a page with the design for anyone that wants something similar.

Fuel and Battery Status Display

Battery monitorThe dual battery system has been missing a couple of things since I first installed it and I’ve spent a few evenings this week playing with a PIC chip and an LCD display. The aim is to have some way of checking the charge level of both batteries and to control the automatic charging of the secondary battery when the main battery is at a reasonable voltage. It will always have the manual overrides of either permanently connecting the aux battery (to jump start the main) or having it disconnected if I want to put all the charge into the main.

As the PIC chip I’ve chosen has plenty of spare capacity I also added provision for it to display the fuel level in each fuel tank too, alternating every 10 seconds between the fuel levels and the battery levels/voltage.

I’m currently using a 16×2 character display but the finished version will be 2×8 characters, allowing it to take up less dashboard space. The programming is just about done apart from calibrating the fuel levels against the two sender units, just need to build the design into something a bit smaller now !

The chip I’m using has another 4 spare analogue inputs so I might add some additional warning monitoring into it yet. Maybe gearbox temperature, fuel pressure perhaps, turbo boost pressure, I’m fitting a dedicated monitoring system so I’ll see what that’s missing and maybe add them into this chip/display. It’s always better to know when something’s starting to go wrong rather than a complete failure being the first sign of trouble.

Fuel system completed ?

Switchover valve, pump and filterFinished the fuel system this weekend, well it might get a few more tweaks yet but it’s all working now at least. I may well end up changing the fuel pump for a higher throughput version and having a pre-filter for each tank rather than a single pre-filter at some point.

The picture on the left shows the under seat fuel tank and to the right of it the changeover valve (top right), filter and pump.

The pipe work was all fitted yesterday and today I made the mounting brackets for the valve and pump and wired it all up. I had to cut into the chassis loom to break the feed to the fuel gauge and wire it through the valve and the fuel pump wires needed extending as the fuel pump is now further forward than it was.

The extra fitting on the pickup plate is for the breather pipe and valve to be connected to as we’re not using a fuel cap with a breather.

To put some fuel into the auxiliary tank and do a basic leak test I decided to disconnect the return pipe from the changeover valve and connect it to the vent connector on the top of the tank. That way the pump would pump from the main (rear) tank, through the engine and into the auxiliary tank. What I hadn’t thought about was that pumping it in through the vent meant there was no where for the air to go… The tank and the filler pipework was all nicely pressurised and when I took the filler cap off it went with a loud pop πŸ™‚ Not sure what pressure it had got up to but the metal tank had expanded ! Fortunately no harm done and, on the plus side, I know now that the custom pipework I made up for the filler is all air tight.

The changeover valve works well, changing the fuel gauge and the fuel pump/return simultaneously, controlled by a switch on the dash. With the engine running you can switch from one tank to the other without the engine missing a beat. The sender on the auxiliary tank seems to match the fuel gauge too giving a reasonably accurate picture of the fuel level.

More fuel capacity

Under seat fuel tank and guard finally fitted

Under seat fuel tank and guard finally fitted

The next stage of adding more fuel capacity is well under way now. In total we should end up with approximately 145 litres, around 32 gallons.

Now the ECU and associated wiring is out from underneath the driver’s seat the next step was to remove the under seat box. That in itself was pretty straight forward as it’s only held in by pop rivets, albeit around 30 of them ! Once they were all drilled out the box itself was easy to remove. I’d not realised until I removed it that the box also fills part of the seat box aperture so I needed to make an aluminium filler plate to close the gap. Fortunately I had some 2mm plate in the garage that was ideal for the job and it’s all closed up now and relatively water tight with the removable cover clipped in place.

New filler cap... and my thumb... :)

New filler cap… and my thumb… πŸ™‚

The fuel pump was also mounted on the side of the ECU box so I had to make a bracket that attaches the fuel pump to the chassis. One immediate effect of that was that the fuel pump is a LOT quieter now it’s not bolted to a box that amplifies the sound.

Getting the fuel tank, the fuel tank guard and the sill bars all fitted at the same time took a lot of work. The tank guard mounting brackets are designed to connect to the same mounting points as the sill guards. This meant that the tank guard brackets all needed to be modified so they could all exist together without getting in each other’s way. the tank guard mounting bracket also seemed to be the wrong size to match up with the body so that had to be cut and welded.Β All in all just getting the tank guard fitted at the same time as the sill guard took the best part of two days work.

Under seat fuel filler pipe

Under seat fuel filler pipe

I then spent a day manufacturing the filler pipe that will allow the new tank to be filled using an aero style filler on the side of the back body. Hopefully I’ve got the angles and venting right so it’ll be easy to fill, nothing worse than a tank that has to be filled slowly or with the pump nozzle at strange angles to avoid the pump cutting out all the time.

The filler cap more or less had to be mounted where it is to get enough drop on the tank and be able to fit the pipework in, I’d have liked to get it aligned with the old LPG filler, in fact with hindsight I wish I’d mounted the LPG filler higher so I could have replaced it with the new one.

The pipe is made of 50mm stainless pipe and bends, cut and welded to fit. Hopefully the welds will be diesel tight, never easy to do with a MIG welder but I’m pretty confident I got it right… I’ll find out for sure when I fill the tank !

The next job is to re-plumb the fuel pump and pipework so it can work from either tank as well as having the ability, with a small amount of re-plumbing, to transfer fuel from one tank to the other.

Fuel capacity

Original fittings and cage mountA few months ago we looked at fitting a Safari Equip auxiliary fuel tank as it looked like a good solution to add extra fuel capacity without using up any storage space. It fits under the wheel arch, replacing the pipe between the filler cap and the fuel tank and adding an extra 30 litres of fuel capacity allegedly.

At the time we couldn’t see a way of making it fit though as the roll cage mount clashed with it so we ruled it out. Having talked to Brendan at 4×4 Overlander at some length he offered to “loan” me one so I could try and see if I could modify the roll cage mount to move it out of the way.

Modified cage mountIt took a couple of days to fit due to the changes required to the roll cage mount but, in the end it was possible. On the P&P cage the roll cage brace that goes to the chassis goes to the rear cross member next to the chassis. The aux fuel tank has a cutout in it that looks to be to accommodate a roll cage brace BUT it is for a brace that goes to the end of the cross member.

By spinning the bracing bar through 180 degrees and making a new bracket from the old one and some 6mm plate I managed to reverse the direction of the bracing bar, allowing the tank to fit around it. It’s a close fit and I had to grind the plate down as close to the tube as possible but the tank would just squeeze in.

Fuel tank installedLike many of these jobs it took a lot longer than expected but after two days of fitting, measuring, removing modifying and fitting again it finally went in and was plumbed in, ready for it’s first fill. We still need more fuel capacity but the current thinking is that I look at moving the electrics out from under the driver’s seat and fitting an old style underseat fuel tank which, with the standard tank and auxiliary tank will give us around 140 to 150 litres in total.

Found the missing power

Since fitting the TD5 the performance has been a bit flat at higher revs. While this has been good for fuel consumption figures it’s been a bit annoying. I rigged up a makeshift fuel pressure gauge today using an oil pressure gauge and sender.

Turns out we were only getting 20 psi at the rail, the TD5 is supposed to run at more like 65/70 psi at the rail. I replaced the pickup in the tank with a 300TDi version and it’s transformed the vehicle. A good constant 70 psi at the rail and it shows in the performance. Were it not for the diesel rattle you’d almost think the V8 was back.

Still need to sort the exhaust out though as it’s still running with the “temporary” one I hooked up using bits of the V8 system.

The plan starts here !

This really starts the ball rolling as far as preparing for the trip is concerned. Our chosen vehicle has a 3.9 litre V8 petrol engine that also runs on LPG. The downside of this for a trip like we have planned is that it’s too thirsty to give us the range we need/want without using all the limited interior space for fuel.

Converting the vehicle to diesel makes the fuel situation and range problem a lot simpler so, with some trepidation our beloved V8 90 is going to have an engine and gearbox transplant. A couple of years ago I rebuilt the vehicle and in the process used the main wiring looms from a TD5 Defender. At the time it meant a lot of work integrating the V8 electrics with the TD5 loom but fortunately I did it in such a way that the main harness was untouched. I also changed the fuel tank to a rear mounted TD5 style so there is room for the ECU box under the driver’s seat !

So, we bid farewell to the glorious burble of the V8 and replace it with a tractor engine.. albeit quite an advanced one by Land Rover standards !

We’ve stuck with the auto, a reconditioned/upgraded unit from Ashcrofts, and tracked down a low mileage “15P” prefix engine back in October. I’ve simplified the fuel system, in comparison to the normal TD5 setup, with an external pump and some bits from a 300TDi.

Mike is going to give me a hand when I’m lifting the engines in/out and Patrick will come over with his box of tricks and set up the ECU once the TD5 is in and ready to fire up. I’ve already taken the rocker cover off and got the injector codes off it. The ECUs (I got a spare one) are both configured for a Discovery at the moment so he’ll also reconfigure them for the Defender. Just in case the weather turns nasty I’ve put my plastic “garage” up on the drive to keep the worst of it off.