Category Archives: Safety

Front end redesign

IMG_0416
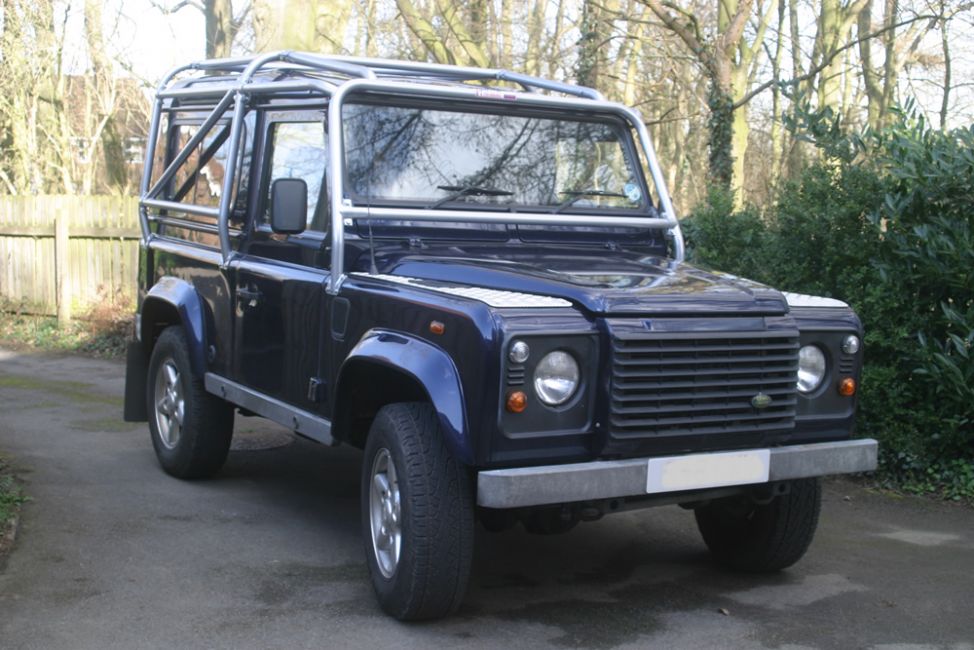
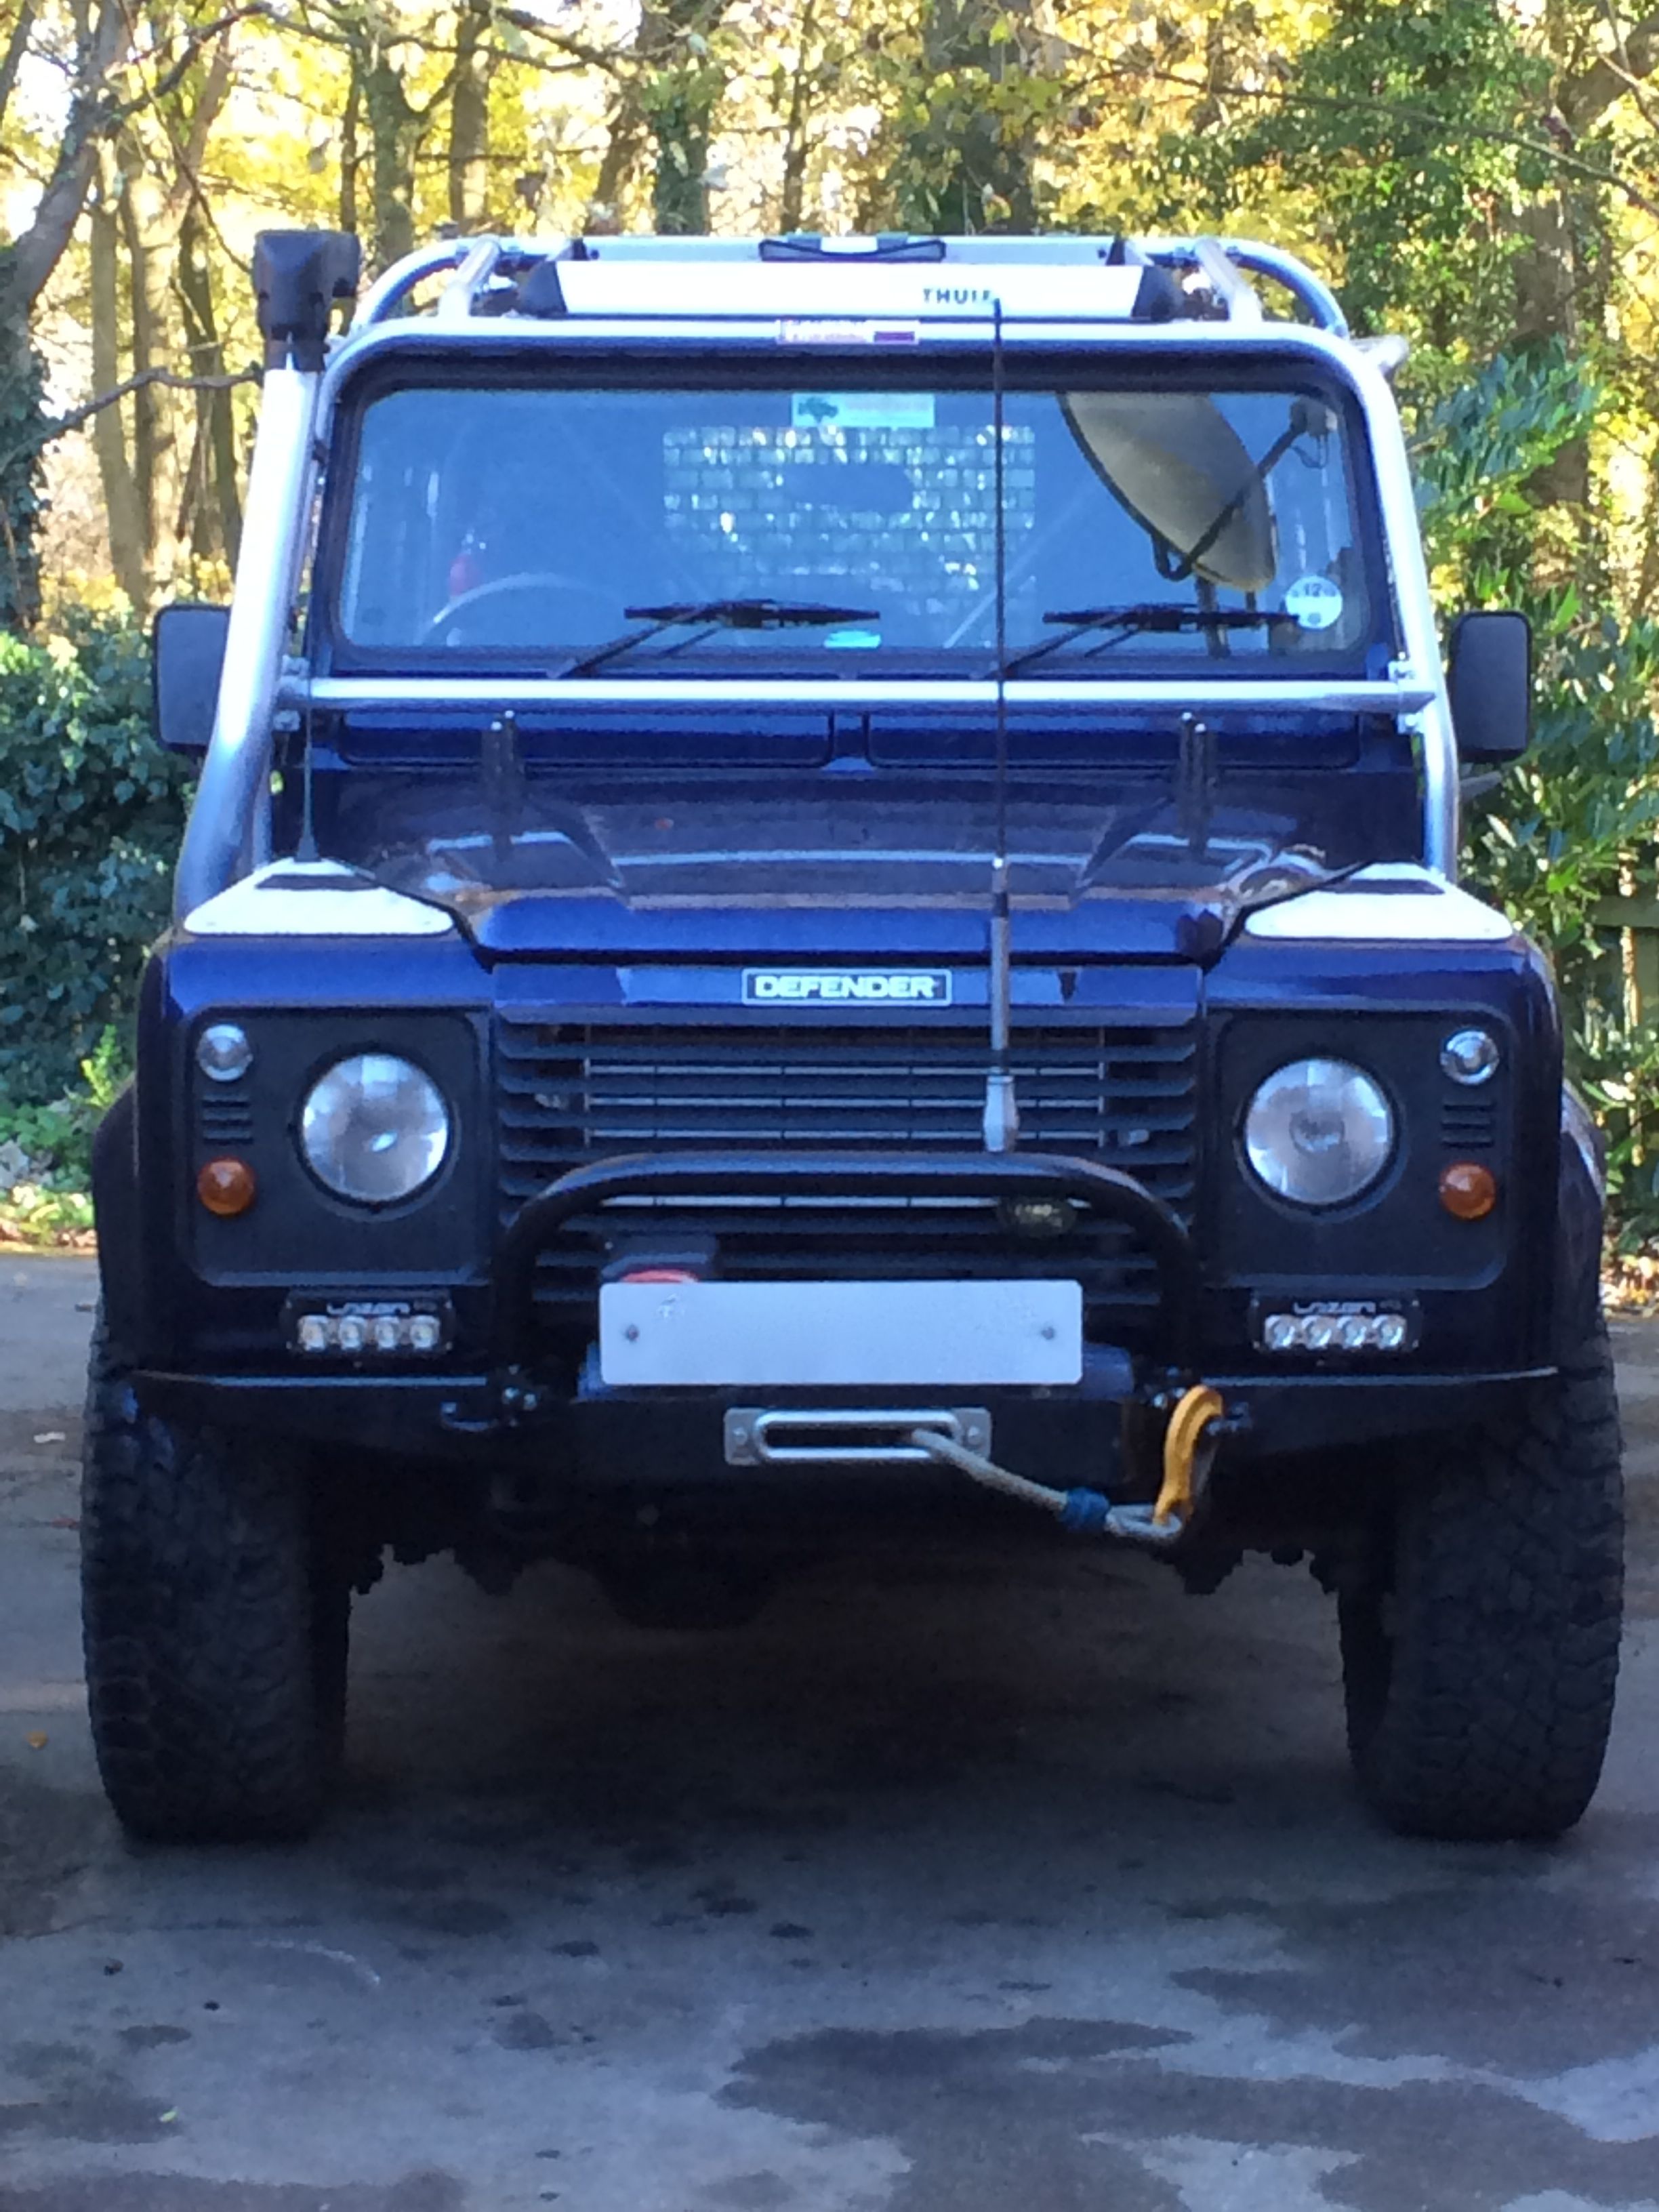
For Australia we felt we were a bit short of frontal protection, hitting a kangaroo at some point in our trip is pretty much a certainty and the radiator is a bit vulnerable. We didn’t want to go too overboard  but felt that some extra protection would be worthwhile. We settled on adding a simple A frame to the top of the bumper that sits around half way across the exposed radiator area. With a bit of luck if/when we get a roo strike it will reduce the chance of any serious damage to the vehicle.

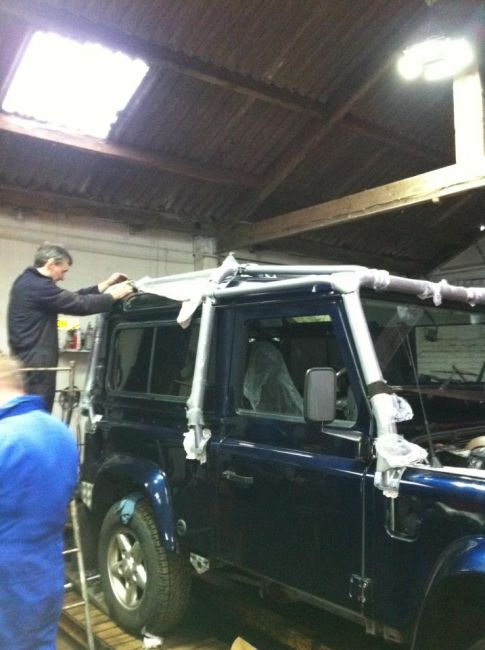
With hindsight we probably should have got a winch bumper with an A bar in the first place but didn’t really like any of those available. I had to call on the services of Patrick at Maddison 4×4 to bend up some CDS to approximately the right shape and I then made up some spreader/mounting plates that bolt to the top of the bumper using the existing bumper mounting bolts and a couple of additional bolts at the front.

I added an aerial mount to the A bar while I was at it but it wasn’t until after it was welded, painted and fitted that Pam pointed out we should have added provision for a sand flag mount ! Sand flags are a good idea regardless but they’re expected to be mandatory on the Simpson Desert routes for 2014. I might add a mount to it and repaint… or we might just end up using some tie wraps and duct tape !

While I had the drill out I also drilled the mounting holes for the front LED spotlight bars to mount to and connected them up to the wiring loom I’d already added.

Remote Comms Sorted

Isatphone ProAnother “major” piece of kit has been acquired now and ticked off the list. We’ve decided to go with a satellite phone for emergency use rather than a radio set although we’ll have the VHF set for “local” communications.

To save some of the budget we went for a second hand one so have been keeping an eye on eBay for the right combination of price and condition. The one we eventually bought came complete with a waterproof Peli case and 60 units prepaid so we can experiment with it and get familiar with it’s features without worrying about the cost.

We went for an Inmarsat Isatphone Pro which seems to be well regarded and certainly initial impressions suggest it’s a well put together piece of kit. It has a whole load of features and options but I guess the most important for our use apart from voice communications is the ability to quickly email or SMS our exact location.

Ready for the snow… I think…

ARB compressor and airline connectorThe last few days have been busy finishing off a number of jobs in final preparation for the trip to Scotland for the Muddy Truckers Trophy, the weather forecast hasn’t improved any… if anything it’s got worse, it’ll be a cold one that’s for certain.

Anyway, got the internal rear window guards all fitted in the back and the rear work lights wired up. The auxilliary fuse box is completely wired back in and providing power for everything it needs to, including the fridge although that may not actually be a necessity for this trip given the forecast temperatures !

Auxilliary fuse boxThe ARBs came back from Crown Diffs so I fitted the rear one together with the spare Ashcroft half shafts. I’ve had those shafts since 2008 when they formed part of the spares kit we took to Australia. They were never used so it makes sense to upgrade the 90 axles with Ashcroft shafts and CVs. The front axle will have to wait until after the Muddy Truckers though as we’re missing a couple of bits.

I plumbed in the ARB compressor, running the pipework for both front and rear diffs, the winch free spool and an airline connector on each side of the vehicle for blowing up tyres etc…

Window guards

Other than packing some tools and the rest of our camping gear, clotting, food, water etc… we’re about ready to go. The pile of bits in the dining room is definitely diminishing 🙂

Escape hatch and spare wheel carrier

Escape hatch fittedWe’ve never been completely happy with the glass sunroof on the 90. Apart from the fact it leaks (don’t they all !) we probably don’t want a sun roof in for Australia. As well as the obvious problems of heat there’s also the fact that it’s quite vulnerable, especially when Pam is doing her roof tent monkey act. A number of times she’s stepped on the sun roof, albeit only lightly, but inevitably one day it’s going to shatter.

Interior view of escape hatchThe solution was to buy the military version of the sun roof that was fitted to military Defenders and termed an escape hatch. Essentially this is identical to a normal sunroof and fits in exactly the same way but the glass panel is replaced with a substantial aluminium panel. Being military the outside is painted in matt green but that will get sorted when the weather warms up a bit. The aluminium panel also lifts out completely if required, allowing you to exit the vehicle that way or access the roof.

It only took an hour to get the old sunroof out and the new escape hatch in, it then rained and, fortunately no leaks, even with the hose pipe on it.

Another job completed today was to replace the factory spare wheel carrier with a Mantec one. This will transfer most of the weight of the spare wheel down to the chassis rather than relying on the door and door hinges, hopefully preventing the door from disintegrating on the Australian washboard road surfaces.

Roll cage finished at last :)

Spent a bit of time tinkering with the electrics, tidying up a few bits and pieces and starting to map out the circuit diagram for the aux fuse box. The aux fuse box has sort of evolved over time as each new circuit was added and I ended up with no real idea which fuse was now used for what. I now have a full circuit diagram that will sit in the top of the fuse box for reference and also allow me to wire it back up again correctly !

The side windows on the 90 have rattled pretty much since we got it and have never actually sealed properly from what I can remember. We also want to fit internal window guards at some point and all the available ones we like are designed to fit standard Land Rover pattern windows, which the ones fitted aren’t. The upshot of this is that we’ve bought a pair of new windows from Masai which are pretty much OEM spec and “guaranteed” not to rattle so we can get rid of the bits of card/cloth/paper that have been pushed into the joints in an attempt to stop it rattling.

The first problem with changing the windows is the fact that the roll cage is in the way so replacing the windows first involves removing the whole of the rear half of the roll cage. When we fitted the cage we left four bolts out (two on each side) because to drill the holes meant marking them then taking the rear of the cage off again. So, as well as replacing the windows now was the time to finally finish off the cage installation !

It took pretty much the whole day to do the job as, as it turns out, not only did the old windows not use OEM catches they were also a different shape ! This meant quite a lot of time was spent cutting and filing the existing opening out to make it big enough for the new windows. Eventually though the windows were in and the roll cage refitted complete with the new bolts to connect the top of the sides with the internal hoop. While the rear cage was off I also made some gaskets to go between the cage mounting plates and the body, cut from a large sheet of butyl rubber that used to line our pond.

First tests show that the windows don’t rattle and they seem to be water tight… so that’s a bonus !

Fuel capacity

Original fittings and cage mountA few months ago we looked at fitting a Safari Equip auxiliary fuel tank as it looked like a good solution to add extra fuel capacity without using up any storage space. It fits under the wheel arch, replacing the pipe between the filler cap and the fuel tank and adding an extra 30 litres of fuel capacity allegedly.

At the time we couldn’t see a way of making it fit though as the roll cage mount clashed with it so we ruled it out. Having talked to Brendan at 4×4 Overlander at some length he offered to “loan” me one so I could try and see if I could modify the roll cage mount to move it out of the way.

Modified cage mountIt took a couple of days to fit due to the changes required to the roll cage mount but, in the end it was possible. On the P&P cage the roll cage brace that goes to the chassis goes to the rear cross member next to the chassis. The aux fuel tank has a cutout in it that looks to be to accommodate a roll cage brace BUT it is for a brace that goes to the end of the cross member.

By spinning the bracing bar through 180 degrees and making a new bracket from the old one and some 6mm plate I managed to reverse the direction of the bracing bar, allowing the tank to fit around it. It’s a close fit and I had to grind the plate down as close to the tube as possible but the tank would just squeeze in.

Fuel tank installedLike many of these jobs it took a lot longer than expected but after two days of fitting, measuring, removing modifying and fitting again it finally went in and was plumbed in, ready for it’s first fill. We still need more fuel capacity but the current thinking is that I look at moving the electrics out from under the driver’s seat and fitting an old style underseat fuel tank which, with the standard tank and auxiliary tank will give us around 140 to 150 litres in total.

Roll cage fitted

normal_cage1Well, the roll cage is now fitted apart from one bolt on each side that will need the rear and the sides of the cage to be removed before I can drill the holes.

It took some fitting but I think the end result is worth it, giving us a mounting system for the tent and anything else we want to put on the roof, supplying separation between the passenger and luggage area and increased safety should the worst happen.

While I’ve certainly saved some cash by fitting it myself, I would strongly recommend anybody fitting one to a “shiny” motor to get P&P to do it – a LOT less stress that way !

normal_cage2normal_cage3

Roll cage fitting

normal_cage902Spent today at Maddison 4×4 fitting the roll cage and getting the 90 through it’s MOT.

I have to say that when P&P gave me a quote for fitting the cage I immediately thought, “how much !”. Having spent the best part of the day fighting with the cage I now think the price they quoted was a bargain.

The cage itself is fine, it all fits beautifully but the stress and pain involved in checking and double checking every measurement before drilling holes in the body work and then fitting and refitting the cage sections without scratching the paintwork is something you don’t appreciate until you try it.

normal_cage90Still, MOT passed OK and with the occasional help of Patrick, Izzy and Terry at Maddison 4×4 it’s mostly fitted now and tomorrow should see the last bits fitted. Pictures courtesy of Terry’s phone 🙂

Chequer plate… over my… oh, wait

normal_90wingtopsDespite spending years completely failing to understand the appeal of chequer plate on Defenders we’ve finally succumbed !

In part it’s because the wings that were replaced a few years ago have holes in them for mounting the chequer plate, as does the back body. There are also practical reasons as we suspect that chequer plate on the wings will give us another option for accessing the roof.

The roll cage arrived a couple of weeks ago and I should be fitting it this weekend if all goes according to plan.

More money spent…

We ordered the roll cage today from Protection and Performance, should be ready in 4-6 weeks. We’re having it delivered to Maddison 4×4 so I can go over and fit it there where there are some extra hands available as and when needed.

It’s an expedition external cage to minimise any loss of interior space but with an internal hoop with cross braces that should make it a lot stronger should the worst happen. The cross should also make a handy mounting point for hanging “junk” from.

The roof tent will mount onto the cage too, giving it a good solid method of mounting.

We’re getting a snorkel with the cage so it matches 🙂